Fully hand-held tutorial on setting up the Java environment to a usable state as quickly as possible. Only knowledge of using the terminal is expected. This tutorial will be completely self-contained (excluding links to downloads).
For more detailed tutorials, see General Development Environment Setup Guide
The general steps are:
- Install Java
- Install Gradle
- Import Repositories
- Install and configure IDE
Ubuntu
Curl
Curl is a package manager that we will use to install some software. To install it, open a terminal and run:
$ sudo apt install curl
Verify installation by running
$ curl --version
Java
Open a terminal.
Use apt to install Verify installation by opening a terminal and typingopenjdk-17-jdk, openjdk-17-doc, openjdk-17-source:# apt install openjdk-17-jdk openjdk-17-doc openjdk-17-source
java -version
Gradle
We are currently on Gradle 7. We will install it manually for ease of understanding. The official guide is here for reference. (Aside: we do not use the Gradle Wrapper)
Open a terminal and run the following:
Macro lookup error: excerpt "Gradle quickstart" was not found on page "Gradle" (with ID 14844185) in space "PUBLIC".
If you're experiencing issues please see our Troubleshooting Guide.
Macro lookup error: excerpt "gradle verify" was not found on page "Gradle" (with ID 14844185) in space "PUBLIC".
If you're experiencing issues please see our Troubleshooting Guide.
Configure for IHMC software
- Navigate to your user home directory.
- Show hidden files.
- Ensure the existence of the file
~/.gradle/gradle.propertieson Ubuntu orC:/Users/<user>/.gradle/gradle.propertieson Windows. - If it is not there, create it manually. This file's settings will override project and system level settings.
- Copy paste the following lines into the file
IHMC Employees:
gradle.propertiesnexusUsername=robotlab-devs nexusPassword=<password> org.gradle.jvmargs=-Xmx4g
Open Source Only:
gradle.propertiesorg.gradle.jvmargs=-Xmx4g
Import Repositories
Quick:
We will be cloning repositories from the command line. Open a terminal and cd to a directory where you want to hold your files. The directory is arbitrary, but you will need to remember it. First, consider a name for your repository group. "repos" works if you only need one workspace. That name will referred to as <repo-name> below. Run the following: Your folder structure should now match what is shown in the next section.$ git clone https://bitbucket.ihmc.us/scm/libs/repository-group.git <repo-name>
$ cd <repo-name>
$ git clone https://bitbucket.ihmc.us/scm/libs/ihmc-open-robotics-software.git
More details:
In your system home folder (or C:/ drive in Windows), create a repository-group. Option 1: Use repository-collections to clone a predefined set of repositories. If you are working on humanoids, use Option 2: Use Git to manually clone the repository group:humanoids.repos .
You may name that repository-group folder something else, like "primary" or "secondary" which helps when you have more than one.
For just ihmc-open-robotics-software
It should look like:repository-group
├── ihmc-open-robotics-software
│ └── build.gradle
│ └── gradle.properties
│ └── settings.gradle
├── <other IHMC repositories as needed>
├── build.gradle
├── gradle.properties
└── settings.gradle
IDE
This guide currently only contains instructions for IntelliJ. We are working on Eclipse.
Eclipse
Full guide: Eclipse IDE
Intellij
Full guide: IntelliJ IDEA
- Download IntelliJ Community.
- https://www.jetbrains.com/idea/download/#section=linux
- Open a terminal and cd into the folder where you downloaded the tar file
Extract the file and move it to /opt/. (If you already downloaded from the link above, there is no need to run curl). Replace the names appropriately based on the version you download.
$ curl -sL https://download.jetbrains.com/idea/ideaIC-2022.1.3.tar.gz -o idea.tar.gz
$ tar -xzf idea.tar.gz
# mv idea-IC-221.5921.22/ /opt/.
# rm /opt/idea
# ln -s /opt/idea-IC-221.5921.22/ /opt/idea
# ln -s /opt/idea/bin/idea.sh /usr/local/bin/idea
IntelliJ is now runnable from the command line:
$ idea
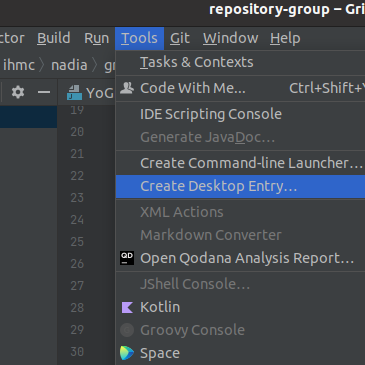
If the desktop launcher is not automatically created, you can open IntelliJ once and select Tools > Create Desktop Entry
- Now you will need to configure IntelliJ to the Java environment you installed.
- Set the Java SDK that you downloaded.
- Go to File > Project Structure > Project Settings > Project.
- Set the <SDK> to Java 17
- Set the <Language Level> to SDK Default.
- Set the gradle version.
- Go to File > Settings > Build, Exectution, Deployment > Build Tools > Gradle.
- Set <Use Gradle From> and select Specified Location. Select the location where you installed gradle to.
- On windows, this will be C:/Gradle/gradle-8.x
- On Ubuntu, this will be /opt/gradle/gradle-8.x
- Set <Gradle JVM> to Project SDK. This should point to the Java SDK you set in the previous step.
- Set the Java SDK that you downloaded.
- Your environment should be ready at this point. Import repository-group.
- File > Open... > select repository-group
- Gradle will take some time to build and index...
- Your projects bar should then look like this (depending on the repositories you cloned):
where all repositories have a blue square on the folder icon indicating they were recognized by gradle as modules.
Network Parameters (IHMC Only)
This step is necessary if you are working on high-level behaviors, but not necessary to run the simulations.
Setup network configurationNetworkParametersCreator.java and save it.RTPSSubnet=10.100.1.34/24)
Windows
Git
- Install Git. Use the 64-bit standalone installer
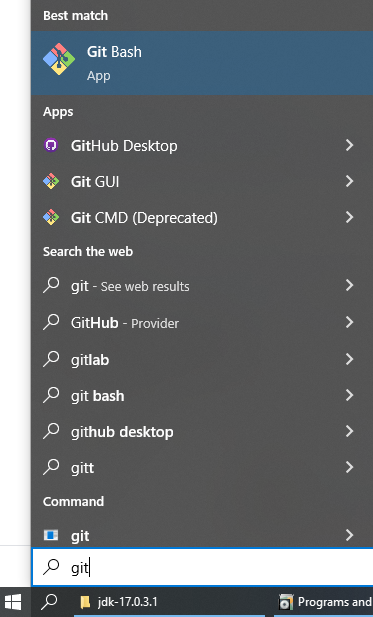
This will be used for all terminal interactions on Windows. Access by searching for Git Bash on the windows search.
Hereby, "open a terminal/console" will refer to launching git bash.
Java
We use Java 17.
Download installer from https://www.oracle.com/java/technologies/downloads/#java17. The x64 MSI installer is the most convenient. Default installation settings are fine. Verify installation. Open a terminal and call Something like the following should be outputted: Aside: java will be installed at the locationOracle (recommended)
java -version
java version "17.0.3.1" 2022-04-22 LTS
Java(TM) SE Runtime Environment (build 17.0.3.1+2-LTS-6)
Java HotSpot(TM) 64-Bit Server VM (build 17.0.3.1+2-LTS-6, mixed mode, sharing)
C:\Program Files\Java
Gradle
We are currently on Gradle 7. We will install it manually for ease of understanding. The official guide is here for reference. (Aside: we do not use the Gradle Wrapper)
- Download the latest Gradle 7 distribution (7.4.2 as of writing).
- Choose the complete version.
- Remember where you downloaded it.
Unpack Gradle (the following are excerpted from the gradle website)
- Create a new directory
C:\Gradlewith File Explorer. - Open a second File Explorer window and go to the directory where the Gradle distribution was downloaded. Double-click the ZIP archive to expose the content. Drag the content folder
gradle-7.4.2to your newly createdC:\Gradlefolder.
- Create a new directory
Add to path
- In File Explorer right-click on the
This PC(orComputer) icon, then clickProperties->Advanced System Settings->Environmental Variables. - Under
System VariablesselectPath, then clickEdit. Add an entry forC:\Gradle\gradle-7.4.2\bin. Click OK to save.
- In File Explorer right-click on the
Macro lookup error: excerpt "gradle verify" was not found on page "Gradle" (with ID 14844185) in space "PUBLIC".
If you're experiencing issues please see our Troubleshooting Guide.
- Configure for IHMC software
- Navigate to your user home directory.
- Show hidden files.
- Ensure the existence of the file
~/.gradle/gradle.propertieson Ubuntu orC:/Users/<user>/.gradle/gradle.propertieson Windows. - If it is not there, create it manually. This file's settings will override project and system level settings.
- Copy paste the following lines into the file
IHMC Employees:
gradle.propertiesnexusUsername=robotlab-devs nexusPassword=<password> org.gradle.jvmargs=-Xmx4g
Open Source Only:
gradle.propertiesorg.gradle.jvmargs=-Xmx4g
Import Repositories
Quick:
We will be cloning repositories from the command line. Open a terminal and cd to a directory where you want to hold your files. The directory is arbitrary, but you will need to remember it. First, consider a name for your repository group. "repos" works if you only need one workspace. That name will referred to as <repo-name> below. Run the following: Your folder structure should now match what is shown in the next section.$ git clone https://bitbucket.ihmc.us/scm/libs/repository-group.git <repo-name>
$ cd <repo-name>
$ git clone https://bitbucket.ihmc.us/scm/libs/ihmc-open-robotics-software.git
More Details:
In your system home folder (or C:/ drive in Windows), create a repository-group. Option 1: Use repository-collections to clone a predefined set of repositories. If you are working on humanoids, use Option 2: Use Git to manually clone the repository group:humanoids.repos .
You may name that repository-group folder something else, like "primary" or "secondary" which helps when you have more than one.
For just ihmc-open-robotics-software
It should look like:repository-group
├── ihmc-open-robotics-software
│ └── build.gradle
│ └── gradle.properties
│ └── settings.gradle
├── <other IHMC repositories as needed>
├── build.gradle
├── gradle.properties
└── settings.gradle
Long Paths
Long paths needs to be configured on Windows for our repositories.
Download and run this script to apply the fix –> Remove 260 Character Path Limit.reg If you need to go back for some reason, run this file: Restore 260 Character Path Limit (Default).reg * Solution source: https://www.howtogeek.com/266621/how-to-make-windows-10-accept-file-paths-over-260-characters/ Set Step 1: Run Registry Modifier
Reverting
Step 2: Set Git configuration
core.longpaths = true core.longpaths to true.git config --global core.longpaths true
IDE
This guide currently only contains instructions for IntelliJ. We are working on Eclipse.
Eclipse
full guide: Eclipse IDE
Intellij
full guide: IntelliJ IDEA
- Download IntelliJ Community. Choose the .exe for convenience
- https://www.jetbrains.com/idea/download/#section=windows
- All default installation options are fine.
- Now you will need to configure IntelliJ to the Java environment you installed.
- Set the Java SDK that you downloaded.
- Go to File > Project Structure > Project Settings > Project.
- Set the <SDK> to Java 17
- Set the <Language Level> to SDK Default.
- Set the gradle version.
- Go to File > Settings > Build, Exectution, Deployment > Build Tools > Gradle.
- Set <Use Gradle From> and select Specified Location. Select the location where you installed gradle to.
- On windows, this will be C:/Gradle/gradle-8.x
- On Ubuntu, this will be /opt/gradle/gradle-8.x
- Set <Gradle JVM> to Project SDK. This should point to the Java SDK you set in the previous step.
- Set the Java SDK that you downloaded.
- Your environment should be ready at this point. Import repository-group.
- File > Open... > select repository-group
- Gradle will take some time to build and index...
- Your projects bar should then look like this (depending on the repositories you cloned):
where all repositories have a blue square on the folder icon indicating they were recognized by gradle as modules.
Network Parameters (IHMC Only)
This step is necessary if you are working on high-level behaviors, but not necessary to run the simulations.
Setup network configurationNetworkParametersCreator.java and save it.RTPSSubnet=10.100.1.34/24)


